English
 Français
Article written by Adrián Jiménez and Lucasberlang
Development teams are overflown with an ever-growing stack of tools, services and infrastructure to maintain. While powerful, this complexity often leads to knowledge silos, inefficient onboarding, and operational bottlenecks. Enter Internal Developer Portals (IDPs) — a product aimed at providing a one stop shop for teams and enabling developer self-service.
The main player in the Open-Source space is Backstage, originally developed by Spotify. Offered as a React based framework to build your own IDP while also allowing easy extension via official or community plugins.
For this article we are going to provide a practical view of how Backstage works along with a basic setup its core functionalities in our repository.
How it works
As the core of Backstage we have its entity system. Wether we want to track existing applications, register a new project template or include our team’s documentation into our Portal — all of this is done by creating and registering an entity.
An entity can be defined in YAML format in a manner very similar to a Kubernetes object. This would be an example of a Group entity.
apiVersion: backstage.io/v1alpha1
kind: Group
metadata:
  name: Sales-Team
  description: The Sales division responsible for revenue generation.
spec:
  type: Tech-Unit
  profile:
    displayName: Sales Department
  members: [lucasberlang, adrijh]
Don’t worry about the particulars of this example, as we will slowly present the different kinds of entities and how they are used during this article. For now let’s concern ourselves with the following question — how do we create them and add them to our portal?.
Of course we have the option to use the frontend interface to manually create some of these objects. But must of them can’t nor should be created in this manner. Backstage (or existing plugins) provides integration with your version control platform or choice, allowing discovery of this items and automatically registering in the portal.
integrations:
  github:
    - host: github.com
      token: ${GITHUB_TOKEN}
In our example repository we are using its integration with Github for entity discovery. Then it’s as simple as specifying the sources of our entities.
providers:
    github:
      catalog:
        organization: 'Syntonize'
        catalogPath: '/catalog/*.yaml'
        filters:
          branch: 'main'
          repository: '^backstage-foundry'
        schedule:
          frequency: { minutes: 5 }
          timeout: { minutes: 3 }
      templates:
        organization: 'Syntonize'
        catalogPath: '/templates/**/*.yaml'
        filters:
          branch: 'main'
          repository: '^backstage-foundry'
        schedule:
          frequency: { minutes: 5 }
          timeout: { minutes: 3 }
      docs:
        organization: 'Syntonize'
        catalogPath: 'techdocs/catalog-info.yaml'
        filters:
          branch: 'main'
          repository: '^backstage-foundry'
        schedule:
          frequency: { minutes: 5 }
          timeout: { minutes: 3 }
What we are doing here is specifying the repositories it should track into via a regex (in our case just the one example repo) a catalogPath specifying the folders to look into in search of these entities.
In a more standard setup, you would get Backstage to search all your repositories and specify different catalogPath patterns for the different kinds of entities according to the way you structure your projects. We have opted for just one repository due to demoing purposes.
With that out of the way, let’s dive into the Software Catalog.
Backstage Catalog
The Backstage Catalog is a centralized system that helps organizations manage and organize their software assets. It provides a structured way to track ownership, dependencies, and relationships between different entities in a developer-friendly portal.
With the catalog, teams can:
- Discover internal tools, services, and APIs easily.
- Define ownership and assign responsibilities to specific teams.
- Manage dependencies between systems, APIs, and resources.
- Ensure governance through standardized documentation and best practices.
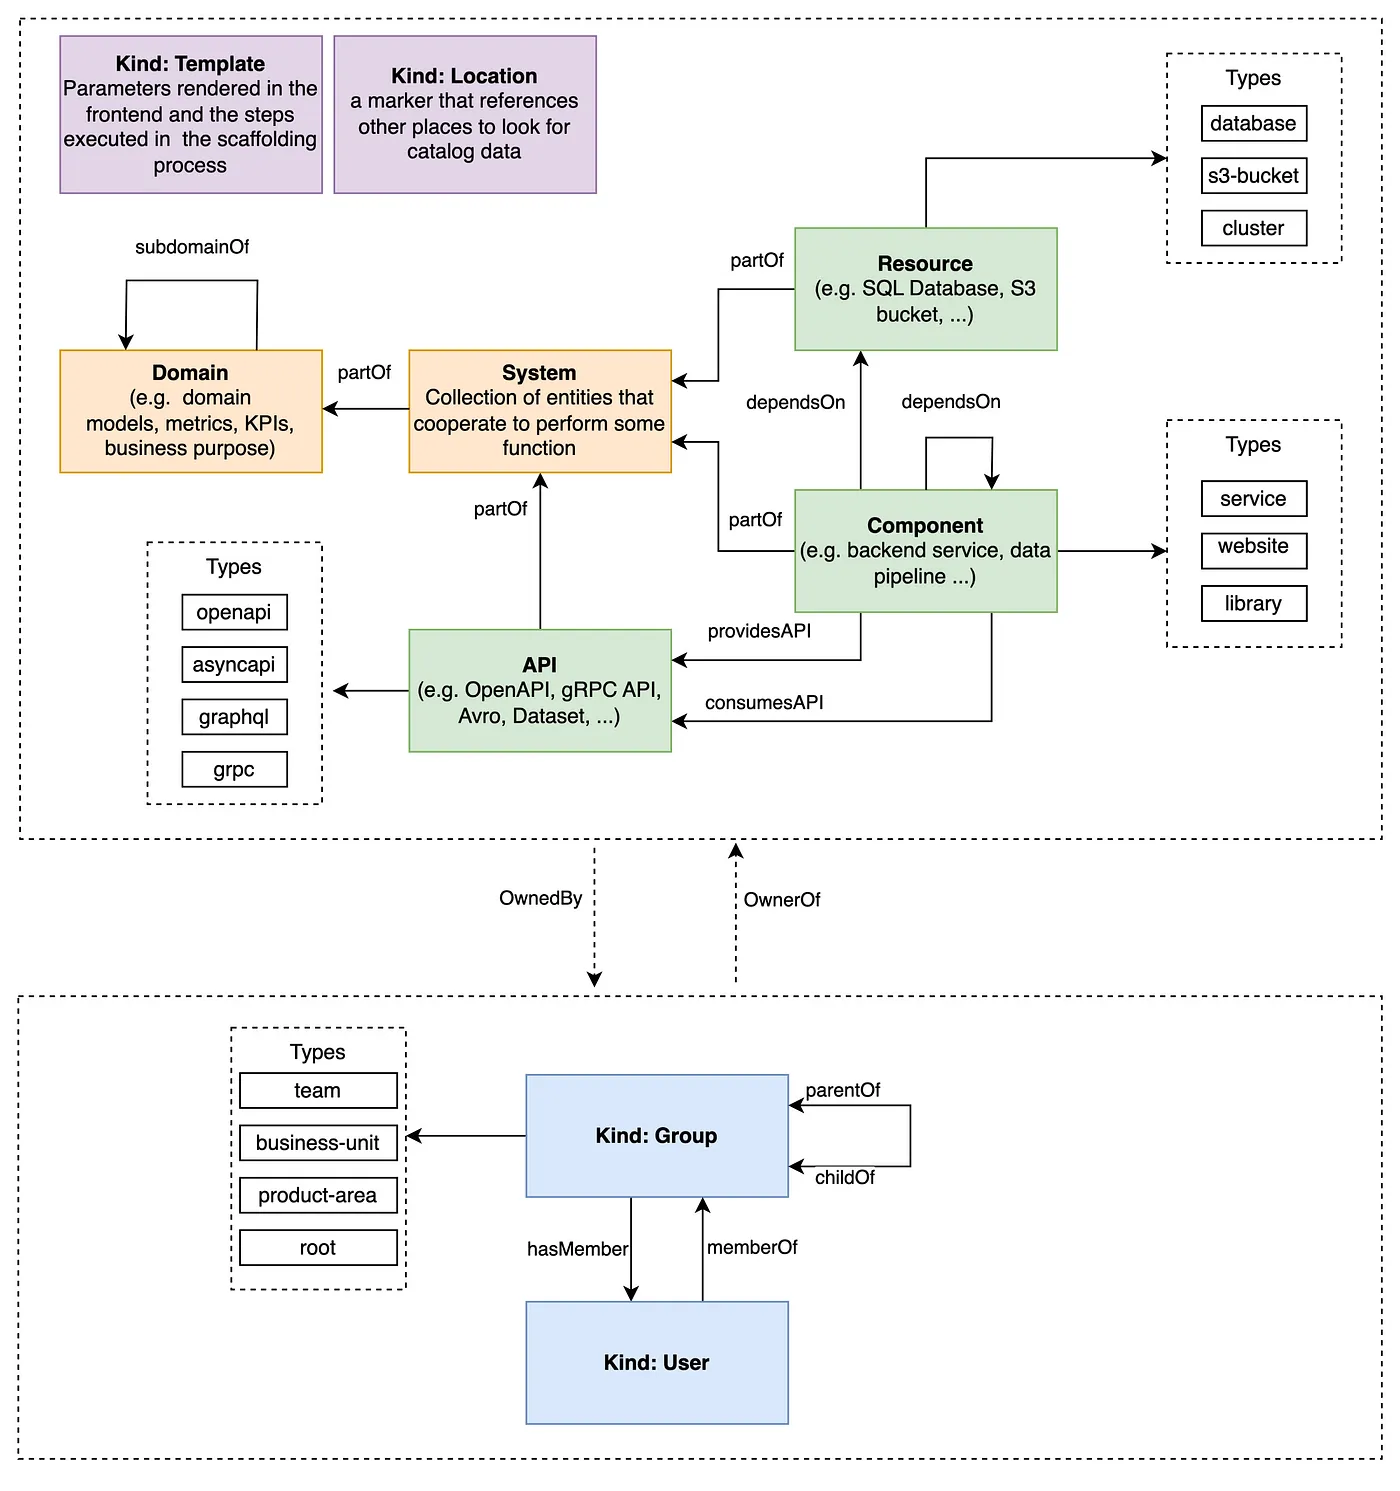
The Backstage Catalog organizes software assets using well-defined entities. These entities include Domains, Systems, APIs, Components, Resources, Groups, and Users, each playing a key role in structuring and managing an organization’s tech ecosystem. Below, we break down these concepts using our example.
Domain: A Domain represents a broad business function that groups related systems together. Domains provide context for what a system is used for. In our example Sales Domain:
apiVersion: backstage.io/v1alpha1
kind: Domain
metadata:
  name: Sales
  description: All systems related to sales operations and customer management.
spec:
  owner: Sales-Team
Sales is a domain that owns multiple systems related to customer management.
It is owned by the Sales-Team, which is responsible for managing the associated systems.
System: A System consists of multiple components, APIs, and resources that work together to achieve a goal. In our example CRM System under Sales Domain:
apiVersion: backstage.io/v1alpha1
kind: System
metadata:
  name: CRM
  description: Manages customer relationships and sales pipelines.
spec:
  owner: Sales-Team
  domain: Sales
The CRM system is responsible for handling customer relationships.
It is owned by the Sales-Team and belongs to the Sales domain.
Component: A Component represents a service, data pipeline, or application that provides or consumes APIs. In our example CRM Backend Service:
apiVersion: backstage.io/v1alpha1
kind: Component
metadata:
  name: CRM-Backend
  description: Backend service for managing customer records.
spec:
  type: service
  owner: Sales-Team
  system: CRM
  providesAPI:
    - Customer-Data-API
  dependsOn:
    - Customer-Database
CRM-Backend is a backend service that manages customer records.
It provides the Customer-Data-API.
It depends on the Customer Database.
Group: A Group represents a team or business unit responsible for systems and components. In our example Sales-team group:
apiVersion: backstage.io/v1alpha1
kind: Group
metadata:
  name: Sales-Team
  description: The Sales division responsible for revenue generation.
spec:
  type: Tech-Unit
  profile:
    displayName: Sales Department
  members: [lucasberlang, adrijh]
- The Sales-Team owns multiple systems, such as CRM and Lead-Tracking.
- lucasberlang and adrijh are members of this team.
User: A User is an individual assigned to a Group, helping manage specific systems, APIs, and components. In our example user in Sales-team:
apiVersion: backstage.io/v1alpha1
kind: User
metadata:
  name: lucasberlang
  description: Lead engineer in the Sales department.
spec:
memberOf: [Sales-Team]- lucasberlang is a member of Sales-Team.
- They are responsible for managing and maintaining the CRM system.
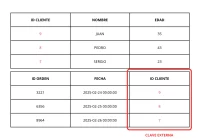
How Everything Connects
- The Sales domain owns the CRM system.
- The CRM system consists of a Backend Component, Customer-Data API, and a Database Resource.
- The Sales-Team Group owns the CRM system and its resources.
- Users (lucasberlang, adrijh) are part of Sales-Team, managing these systems.
This structure ensures clear ownership, better discoverability, and streamlined system management within the Backstage Catalog.
With domains, systems, APIs, components, resources, and ownership structures in place, teams gain visibility, accountability, and streamlined collaboration in their software ecosystem.
Template Scaffolding
We have seen how to track and govern the different components in our organization, but how to create them in the first place? One of the core pieces of Backstage is the Scaffolder, allowing us to leverage prefabricated templates to bootstrap new projects.
The process of creating your own template starts with its YAML definition, consisting of three main parts:
- Parameters — inputs a Backstage user will need to provide to the template. For example project name.
- Steps — Actions the Scaffolding process will take, like fetching the template source code, replacing the parameters and publishing to a new repository.
- Outputs — Values resulting from the scaffolding process we can provide back to the frontend.
apiVersion: scaffolder.backstage.io/v1beta3
kind: Template
metadata:
  name: aws-lambda-template
  title: AWS Lambda Python Template
  description: Scaffolder template for a python AWS Lambda
spec:
  owner: user:guest
  type: service

  parameters:
    - title: Choose Application Details
      required:
        - applicationName
      properties:
        applicationName:
          title: Application Name
          type: string
          description: Enter the name of your application
     - ...

  steps:
    - id: fetch-app
      name: Fetch App
      action: fetch:template
      input:
        url: ./app
        targetPath: ./app
        values:
          name: ${{ parameters.applicationName }}
          owner: ${{ parameters.owner }}
    - ...
    - id: publish-code
      name: Publish App
      action: github:repo:push
      input:
        sourcePath: ./app
        defaultBranch: dev
        description: Publish ${{ parameters.applicationName }} repository
        repoUrl: ${{ parameters.host}}?repo=${{ parameters.applicationName }}&owner=${{ parameters.owner }}
    - ..
outputs:
  ...
In our repository we have included a template for an AWS Lambda project. This template generates two repositories given just a project name
- Application project — base Python repository with best practices and a sample lambda handler.
- Infrastructure project — Terraform project for the initialization of a Dockerized lambda.
Once the template is set up, bootstrapping a project is as simple as filling a form
Techdocs
So far we have covered how to bootstrap new projects and govern them via the Catalog. Backstage also provides a tool for creating and displaying project documention based on the Python MkDocs plugin.
This plugin allows the generation of static documentation sites from markdown files.
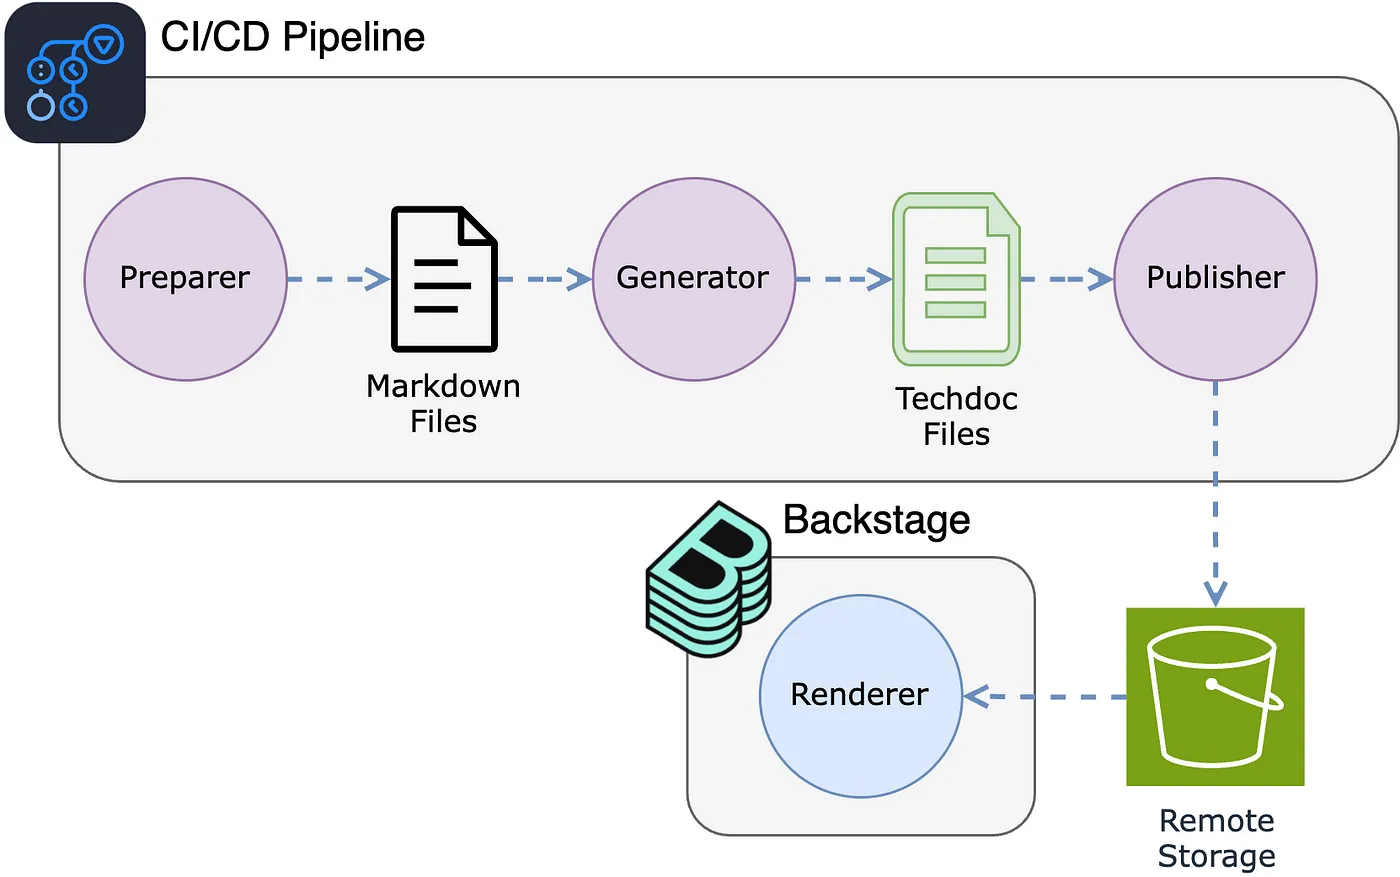
The plugin architecture consists of a few components:
- Preparer — takes the job of pulling the markdown files from the project repository.
- Generator — converts the markdown documentation into MkDocs rendered files.
- Publisher — uploades the rendered documentation to the storage of choice
- Renderer — component in our Backstage application able to render the MkDocs files.
Both the architecture and the basic usage of the Techdocs plugin can be visualized in the following diagram

In the basic deployment all components run in the Backstage application. Though it is possible to use a remote storage instead of the application’s local filesystem.
The recommended approach shifts the responsability of gathering and generating the Techdoc files to your CI/CD pipeline. That way the Backstage only needs to pull the files from the storage and render them.
Additionally the Techdocs plugin includes optional caching components to have the most frequently rendered documentation readily available.
Creating a Techdoc project is simple, we start by including our documentation repository in the Software Catalog.
apiVersion: backstage.io/v1alpha1
kind: Component
metadata:
  name: example-docs
  annotations:
    backstage.io/techdocs-ref: dir:.
spec:
  type: documentation
  lifecycle: experimental
  owner: group:RnD-Lab
It looks like an standard Component, but notice the annotation backstage.io/techdocs-ref. This will tell the Techdocs plugin where to locate the source markdown files it will use for the site generation.
The remaining setup follows the standard MkDocs structure. At its core, MkDocs uses a configuration file, mkdocs.yml, to define how your source Markdown files will be organized and rendered into a documentation site.
A basic configuration looks like this:
site_name: Example Techdocs
site_description: Our example docs
plugins:
  - techdocs-core
nav:
  - Home: index.md
  - A Section:
    - Subsection I: subsection_1.md
    - Subsection II: subsection_2.md
Deploying Backstage
If you are interested in testing Backstage to see if it fits your organization, you can run our example Backstage application locally using Docker Compose.
If you want something more robust, we have also provided a basic AWS setup with Terraform in our repository. For starters it will automatically build the application’s Docker image and upload it to AWS Container Registry.
From there it will deploy an ECS Service backed by an EC2 Capacity Provider. You can use Fargate if you wish, but we opted for EC2 to keep costs low.
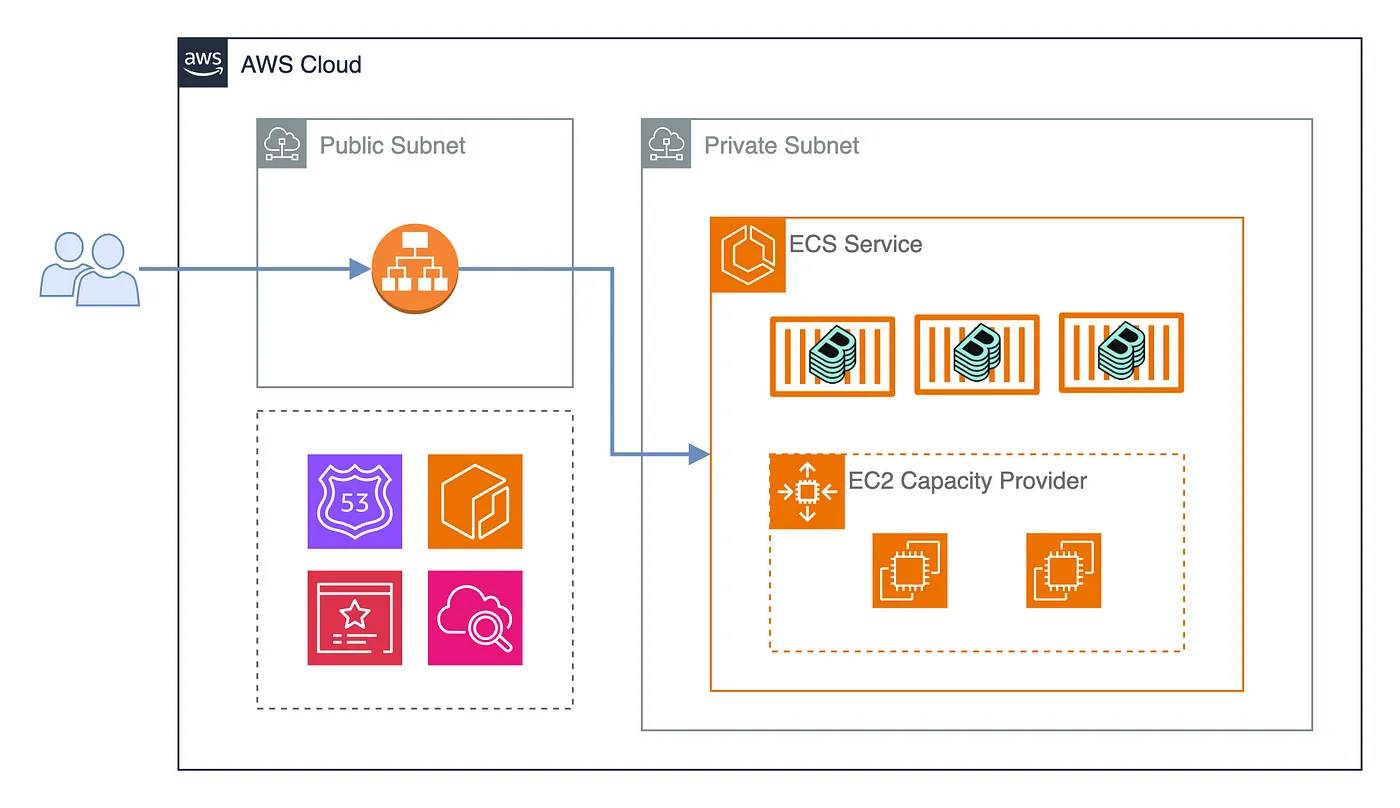
The architecture will be secure by default, it will deploy the ECS Service in a private subnet of your choice. You will also need to specify a public subnet for the ALB that will allow connectivity to the application.
Importantly, Backstage applications in production will need a proper Authorization mechanism. In our example we have used a simple Github OAuth App which is quite easy to setup.
Finally we recommend you setup your domain and a record pointing to the ALB’s IP address. In the provided Terraform we use the Load Balancer integration with Certificate Manager to achieve this with ease.
Wrapping Up
Internal Developer Portals are gaining momentum, and Backstage has become one of the go-to solutions for teams looking to bring order to their growing service landscape. Its modular architecture and plugin systemmake it easy to extend, so you can tailor it to fit your organization’s needs.
By making documentation, APIs, and infrastructure easily accessible, Backstage helps developers focus on building instead of wasting time searching for information. It’s not just another tool — it’s a foundation for a more efficient, self-service engineering culture.
But setting up Backstage isn’t just about installing a tool — it takes dedicated effort from a platform team to maintain, integrate, and drive adoption. The payoff? Developers spend less time on overhead and more time delivering value.